Literate programming is a
technique that caught my attention after recently stumbling upon Howard Abrams’
‘Literate Devops with Emacs’ video. The
intersection of watching this awesome video, reading about
GeoJSON rendering on GitHub
and returning from a road trip last summer led me to building my own travel
log. In my first blog post I would like to show you how it works.
Creating a travel log means entering a lot of data like dates and locations; a job that can be tedious without a user-friendly interface. It shouldn’t be too hard to beat exisiting online travel log services, such as the well-known Dutch website ‘WaarBenJij.nu’, in this aspect. Besides, what happens to your data when the online travel log company goes bankrupt? These two shortcomings are easily addressed with common programmer tools like Emacs’ Org mode and distributed version control systems like Git. While most programmers are familiar with the features of Git and GitHub, those of Org mode are less-known:
“Org mode is for keeping notes, maintaining TODO lists, planning projects, and authoring documents with a fast and effective plain-text system.” — http://orgmode.org
In addition to Org mode, we use the
Babel extension to execute source
code in various languages (in this case just Shell and Ruby) in between the blog
post paragraphs. By using these blocks exclusively, we will create all the
code necessary to: geocode the locations in the travel log to coordinates (and
install a library that helps us do this), convert the travel log to a GeoJSON
file, commit and push it into a new repository, and open GitHub in a browser at
the right URL. In fact, you can copy & paste this blog post into Emacs, enter
org-mode and execute everything (org-babel-execute-buffer) to reproduce my
steps.
Enough talking, let’s build this thing! We begin by defining the travel log, and
‘store it in a variable’ called travel-log.
#+NAME: travel-log
#+RESULTS:
| Date | Location |
|------------------+---------------------------|
| <2015-08-10 Mon> | Utrecht, The Netherlands |
| <2015-08-10 Mon> | Kožná, Prague |
| <2015-08-12 Wed> | Prenzlauer Berg, Berlin |
| <2015-08-13 Thu> | A&O Hamburg City, Hamburg |
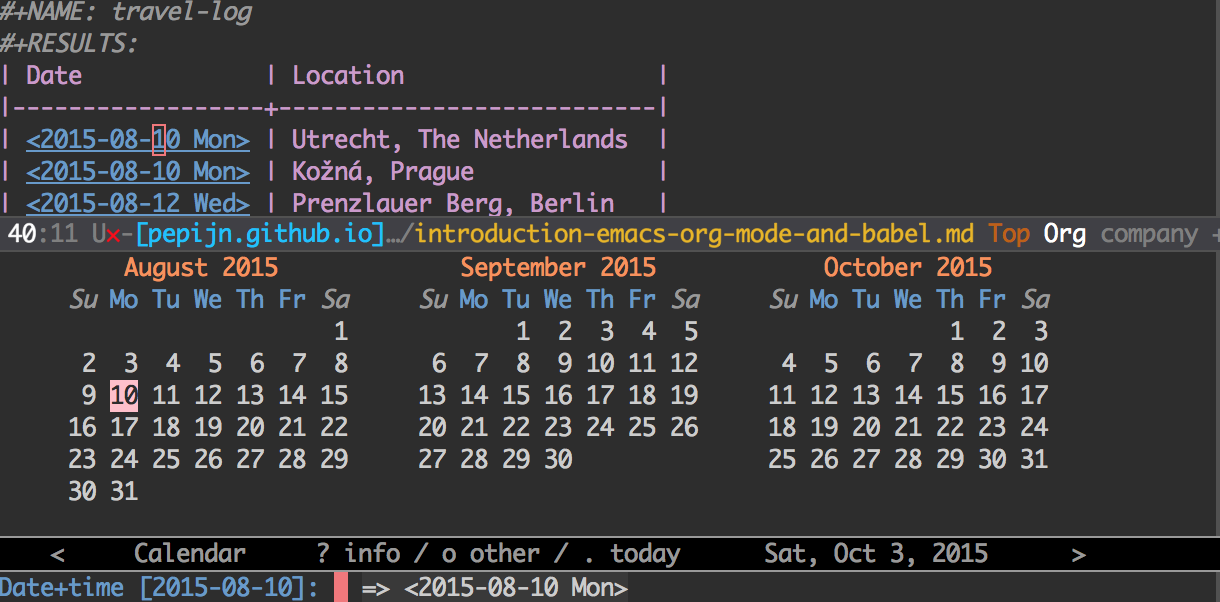
| <2015-08-14 Fri> | Utrecht, The Netherlands |The brackets (< and >) around the dates indicate an Org mode timestamp. We
can easily add and manipulate dates by using the datepicker (C-c ., which, for
those unfamiliar with Emacs, means pressing the Control and C keys
simultaneously before hitting the dot) and use TAB to move through the table:
a user-friendly interface.
In order to geocode the location names to coordinates we will use the
geocoder Ruby gem. A shell source
code block is an excellent way to install it, most importantly because the
output displays the version that I used while writing the blog post, which
improves reproducibility.
#+HEADER: :results output
#+BEGIN_SRC sh

gem install geocoder

#+END_SRC

#+RESULTS:
: Successfully installed geocoder-1.2.11
: Parsing documentation for geocoder-1.2.11
: Done installing documentation for geocoder after 1 seconds
: 1 gem installed
Now we will geocode the locations using the gem above. We don’t want to get
rate-limited by the Google Maps API, so that’s why we create the
geolocation-cache table with the distinct locations and their coordinates. For
instance, Utrecht is listed twice in the travel log but only geocoded once. By
the way, the #+HEADER: and #+BEGIN_SRC lines are instructions to Babel. I
included them to enhance reproducibility.
#+HEADER: :var travel_log=travel-log
#+BEGIN_SRC ruby

locations = travel_log.map do |entry|
  # We only need the second column: the location
  _, location = entry
  location
end

distinct_locations = locations.uniq

require 'geocoder'
distinct_locations.map do |location|
  geo = Geocoder.search location
  coordinates = geo.first.geometry['location']

  [location, coordinates['lng'], coordinates['lat']]
end
#+END_SRC

#+NAME: geolocation-cache
#+RESULTS:
| Utrecht, The Netherlands  |  5.1214201 | 52.09073739999999 |
| Kožná, Prague             | 14.4213456 |        50.0862754 |
| Prenzlauer Berg, Berlin   |   13.44009 |          52.54114 |
| A&O Hamburg City, Hamburg |  9.9936818 |        53.5510846 |
Before we move on to the GeoJSON conversion, we have to specify a path where we can save the file.
#+NAME: geojson-file-path
#+RESULTS:
: /tmp/example_travel_log/my_trip.geojson
The following source block joins the travel-log with the geolocation-cache,
builds a GeoJSON-formatted structure and saves it to the
geojson-file-path.
#+HEADER: :results silent
#+HEADER: :var geojson_file_path=geojson-file-path
#+HEADER: :var geolocation_cache=geolocation-cache
#+HEADER: :var travel_log=travel-log
#+BEGIN_SRC ruby

coordinates = Hash[geolocation_cache.map do |entry|
  location, longitude, latitude = entry
  [location, [longitude, latitude]]
end]

require 'date'
geojson_features = []

# We use each_cons so we can draw lines between the locations
travel_log << nil
travel_log.each_cons(2) do |entry, next_entry|
  org_date, location = entry

  date = Date.parse org_date

  geojson_features << {
    type: 'Feature',
    geometry: {
      type: 'Point',
      coordinates: coordinates[location]
    },
    properties: {
      Location: location,
      Date: date
    }
  }

  next unless next_entry
  _, next_loc = next_entry
  geojson_features << {
    type: 'Feature',
    geometry: {
      type: 'LineString',
      coordinates: [coordinates[location], coordinates[next_loc]]
    }
  }
end

require 'fileutils'
repository_dir = File.dirname geojson_file_path
FileUtils.mkdir_p repository_dir

require 'json'
open(geojson_file_path, 'w') do |file|
  file.write JSON.pretty_generate(
    type: 'FeatureCollection',
    features: geojson_features
  )
end
#+END_SRC
Let’s verify the contents of the newly created file before we move on.
#+HEADER: :results output
#+HEADER: :var GEOJSON_FILE_PATH=geojson-file-path
#+BEGIN_SRC sh
head -n 33 '' $GEOJSON_FILE_PATH
echo etc...
#+END_SRC

#+RESULTS:
#+begin_example
==> /tmp/example_travel_log/my_trip.geojson <==
{
  "type": "FeatureCollection",
  "features": [
    {
      "type": "Feature",
      "geometry": {
        "type": "Point",
        "coordinates": [
          5.1214201,
          52.09073739999999
        ]
      },
      "properties": {
        "Location": "Utrecht, The Netherlands",
        "Date": "2015-08-10"
      }
    },
    {
      "type": "Feature",
      "geometry": {
        "type": "LineString",
        "coordinates": [
          [
            5.1214201,
            52.09073739999999
          ],
          [
            14.4213456,
            50.0862754
          ]
        ]
      }
    },
etc...
#+end_example
The date, location and coordinates seem to match with the travel log we specified earlier. Let’s create a repository, commit, push and open GitHub to check it out!
#+HEADER: :results output silent
#+HEADER: :var GEOJSON_FILE_PATH=geojson-file-path
#+BEGIN_SRC sh
cd "$(dirname $GEOJSON_FILE_PATH)"

FILENAME="$(basename $GEOJSON_FILE_PATH)"

brew install hub
hub init
hub create
hub add $FILENAME
hub commit -m 'Update travel_log' $FILENAME
hub push origin master

GH_PATH_ROOT="$(hub remote -v | grep fetch | grep -oE '\w+\/\w+')"
hub browse "$GH_PATH_ROOT/blob/master/$FILENAME"
#+END_SRC
*Safari opens…*
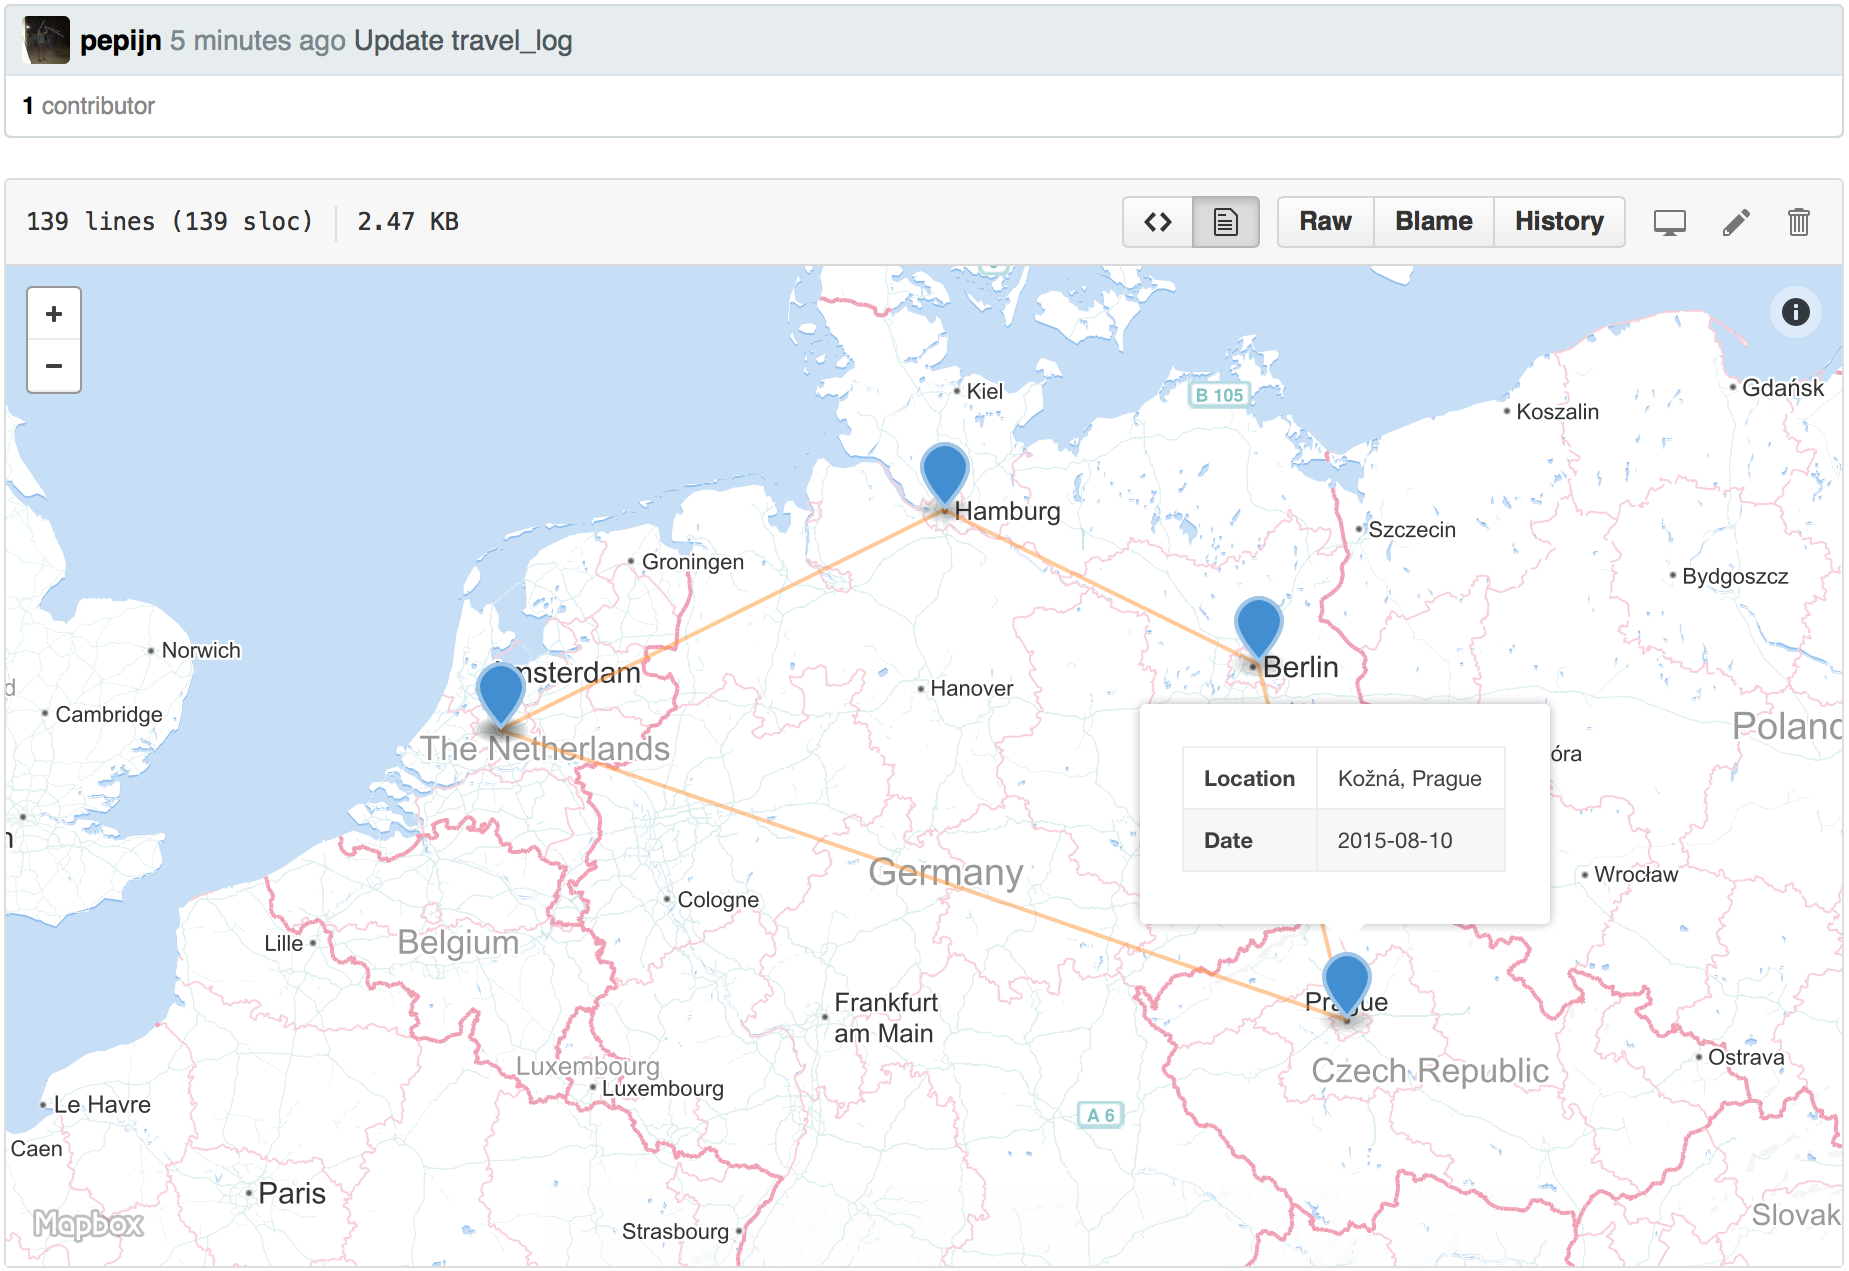
It works; all the destinations from the travel log show up on the map with lines connecting them. Whenever we change the travel log or the code we can just rerun all the source code blocks and check out the new result; no slow switches between editors and command lines. All in all, the consequential higher speed of development and improved transparency of the program will most definitely make me pick Org mode and Babel for future projects.
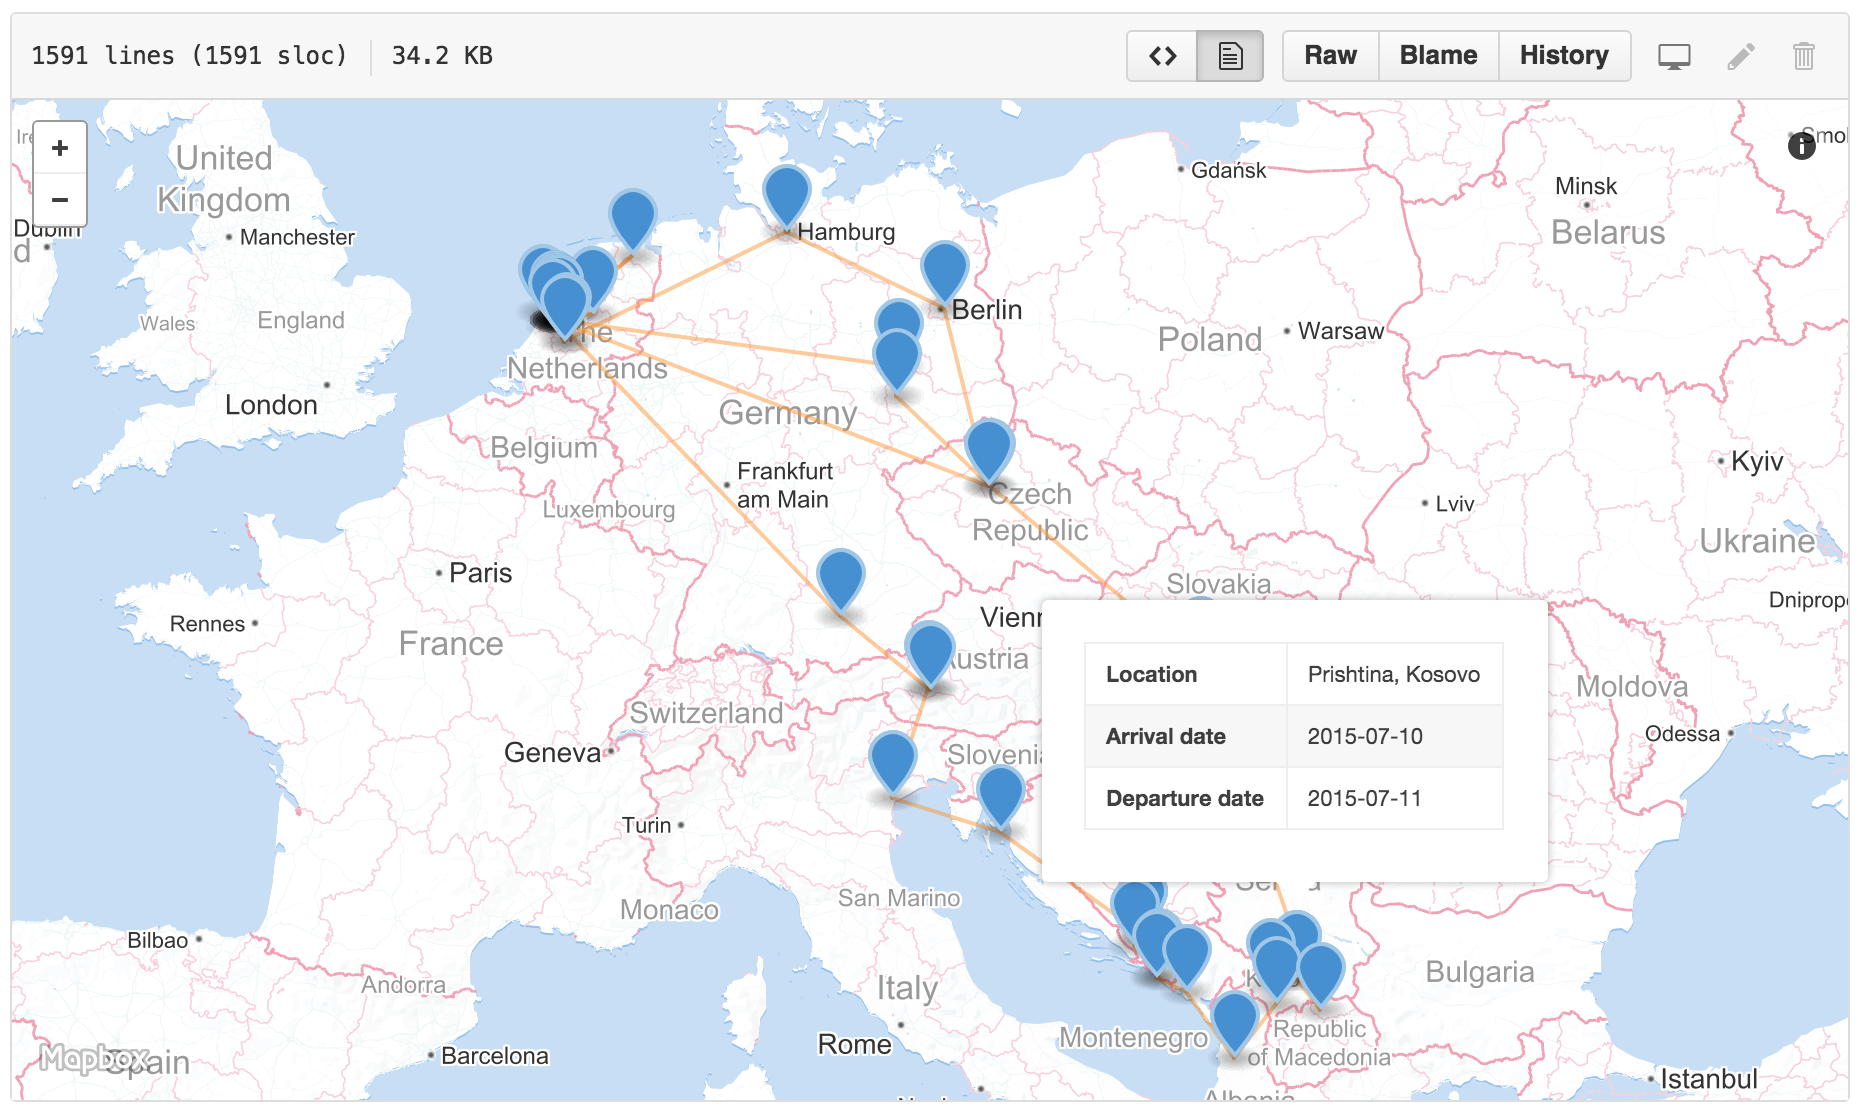
For a more feature complete implementation that might actually be useful for real-life travel logging, please check out: https://github.com/pepijn/travel_log. Manipulating it (adding a destination) looks like this:
Happy hacking!